Mistiness Text on a PowerPoint Slide to Create Interesting Effects
by Avantix Learning Team | Updated May 31, 2021
Applies to: Microsoft ® PowerPoint ® 2013, 2016, 2019 and 365 (Windows)
Blur is an creative effect that you can apply to a picture in PowerPoint. Nonetheless, creative furnishings cannot be applied to text boxes or text placeholders. If y'all desire to mistiness text in PowerPoint, you'll need to cut the text object and and then paste it back into PowerPoint as a picture. You will and so be able to mistiness the text.
You tin create some interesting effects if you lot combine animation with mistiness such as making clear text changing to blurred text and vice versa.
Recommended article: How to Match Colors in PowerPoint Using the Eyedropper
Exercise you want to learn more near PowerPoint? Check out our virtual classroom or live classroom PowerPoint courses >
Annotation: Some Ribbon tabs may appear with slightly different names if you are working on Office 365 and have a smaller screen or unlike display settings.
Applying a blur effect to text
To apply a blur effect to a text object:
- In Normal View, select the text object by clicking its edge.
- Press Ctrl + Ten to cut information technology. You can also printing Ctrl + C to copy it.
- Click on the slide and then click Paste on the Home tab in the Ribbon. A drop-down menu appears.
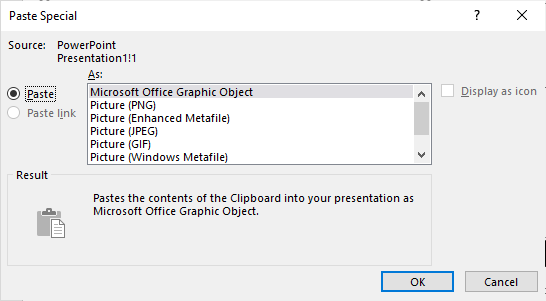
- Select Paste Special. A dialog box appears.
- Select PNG and click OK or press Enter. PNG has a transparent background so it'south normally the all-time choice. You cannot apply blur to some of these epitome formats.
- Click the moving picture.
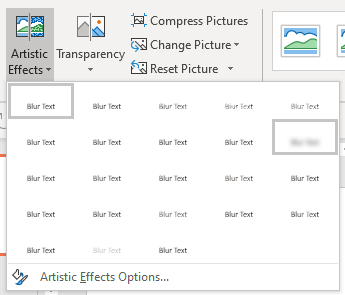
- Click the Motion-picture show Tools Format or Picture Format tab in the Ribbon and select Creative Effects in the Accommodate grouping. A drib-downward menu appears.
- Select Mistiness (the terminal selection in the second row).
Y'all may still need to delete the original placeholder.
Select PNG in the Paste Special dialog box (although y'all can use other formats, PNG has a transparent background):
Mistiness appears in the Artistic Effects drop-down menu:
Increasing the mistiness
You lot can increase the blur applied to a motion-picture show using the Format Motion-picture show task pane in PowerPoint 2013 and later versions:
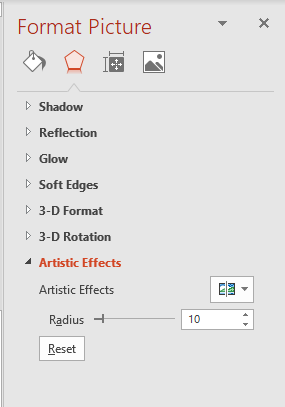
- Right-click the blurred paradigm and select Format Picture. A task pane appears.
- Click the Furnishings button at the pinnacle of the task pane.
- Click the arrow beside Artistic Effects to expand it.
- Drag the slider line beside Radius to increase the mistiness.
Beneath is the Format Moving-picture show task pane:
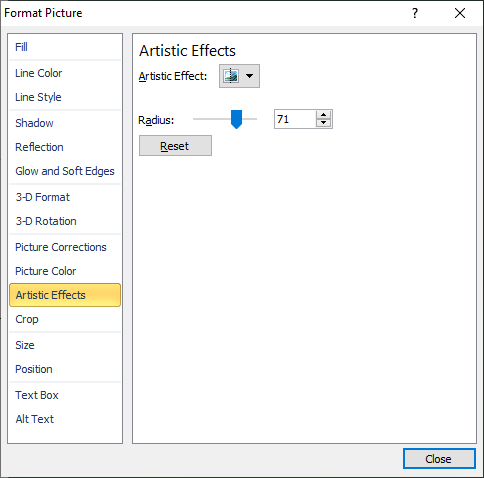
You can increment the blur applied to an image using the Format Picture dialog box in 2010:
- Right-click the blurred image and select Format Picture. A dialog box appears.
- Click Artistic Furnishings in the categories on the left.
- Drag the slider line beside Radius to increment the blur.
The Format Pic dialog box displays as follows when Artistic Effects is selected:
You can achieve some interesting effects with blur with unlike types of images.
Subscribe to go more articles like this one
Did y'all find this article helpful? If you lot would similar to receive new manufactures, join our email list.
More resources
How to Mistiness an Image in PowerPoint
Troubleshoot Slide Numbers in PowerPoint Decks
How to Go Slide Pattern Ideas Using PowerPoint Designer
How to Remove the Background of a Motion picture in PowerPoint (two Ways)
Where to Find Complimentary Images for Your PowerPoint Presentations (x Smashing Stock Photo Sites)
Recommended courses
Microsoft PowerPoint: Intermediate / Avant-garde
Microsoft PowerPoint: Design for Not-Designers
Microsoft PowerPoint: Animations Bootcamp
Microsoft Excel: Intermediate / Avant-garde
VIEW More than COURSES >
Our teacher-led courses are delivered in virtual classroom format or at our downtown Toronto location at i Yonge Street, Suite 1801 (Toronto Star Building), Toronto, Ontario, Canada (some in-person classroom courses may besides be delivered at an alternating downtown Toronto location). Contact united states of america at info@avantixlearning.ca if you'd like to adapt custom onsite preparation or an online course on a engagement that'southward user-friendly for yous.
Copyright 2022 Avantix ® Learning
Microsoft, the Microsoft logo, Microsoft Office and related Microsoft applications and logos are registered trademarks of Microsoft Corporation in Canada, Usa and other countries. All other trademarks are the holding of the registered owners.
Avantix Learning | ane Yonge Street, Suite 1801 (Toronto Star Building), Toronto, Ontario, Canada M5E 1W7 | info@avantixlearning.ca
DOWNLOAD HERE
How to Make Letters Clear in Powerpoint TUTORIAL
Posted by: melindamusbad.blogspot.com


Comments
Post a Comment